Mastering the Art of KonafaBy CairoCooking • May 20, 2017
We all know that feeling of anticipation… Eating with family and friends while knowing a freshly baked konafa is coming out of the oven soon… Golden, thin, crispy and shimmering with light sweet syrup on top…who can resist that temptation?!! You secretly try save your savory calorie intake as you wait impatiently for that precious moment. You convince yourself that by eating less, it will be ok to indulge on a second piece of that long awaited konafa…
To cut a long story short, whether it’s the holy month of Ramadan or any other time of the year, no matter how many great desserts are on the table, nothing can beat a well-executed homemade konafa.
In every family or group of friends, there is that special person (usually an experienced homecook) whose konafa is not just delicious, but exceptional! Luckily, my close friend, Yasmine Mattar, is one of those… so I decided to visit her kitchen to discover the secrets behind one of my guilty pleasures. ‘Konafet Tante Fifi’ recipe was given to Yasmine by her aunt along with every imaginable trick and tip (all shared here!), which she practices to perfection.
So if doing that special Konafa is something you want to master, search no further, this is what you have been looking for!

Ingredients:
500 gram konafa
0.5 cup corn oil
250 gram butter (melted)
For the filling:
3 cup milk
4 tablespoon corn flour
4 tablespoon sugar
1 pack vanilla
For the syrup:
2 1/2 cup sugar
1 pack vanilla
1 1/4 water
1/2 small lime (juice)
Recipe Instructions:
The syrup
1. Always start with the syrup since you will need it to cool down before you pour it on the warm Konafa. Yasmine likes to do a big quantity of syrup to keep in the fridge. This saves her time and energy on the day she makes the Konafa or any other oriental dessert. According to her recipe, the ratio of the sugar to water is 2:1.
2. Heat water and sugar on medium heat. Do not stir or stir to a minimum so that sugar doesn’t stick on the sides of the pot and burns. When it boils, lower the heat and leave to simmer for about 5- 8 minutes until slightly thickened.
3. Add the lemon juice turn off the heat. It will not be as thick as honey, however it will thicken more as it cools.
4. Add the vanilla while the syrup cools. Vanilla should never be added while the syrup is still cooking or it may result into a bitter taste.
After the syrup, you can resume with the Konafa filling, since it will also need time to cool.
The Cream Filling
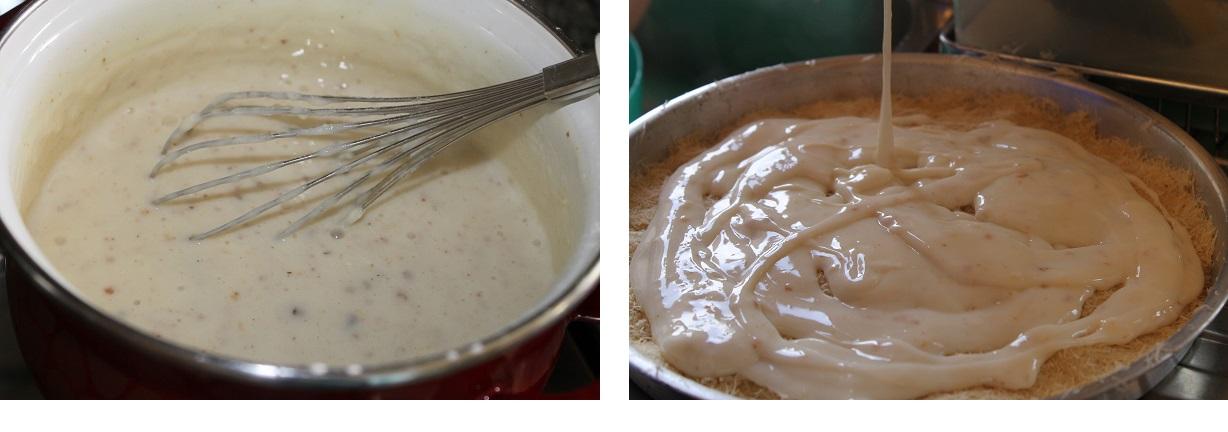
1. Mix the cold milk, sugar and corn flour together in a pot and stir well. The milk needs to be cold so the corn flour dissolves without lumps.
2. Place the pot over medium heat. When it starts to boil, lower the heat and stir until it thickens. It will take about 5 minutes. If you feel it needs extra corn flour to thicken, mix one tablespoon corn flour with little cold milk and add to the pot. It needs to have the thick consistency of a pudding when it cools.
3. Add the vanilla once it is off the heat and leave it to cool.
Yasmine’s Tip: Your filling might have brownish burned bits – these won’t affect the taste so no worries.
The konafa
Yasmine’s Tip: when you buy the Konafa, put it as it is without any cutting in the freezer. Take it out 30 minutes before preparation time to defrost a bit. The frozen Konafa will be easily breakable into small pieces when it is frozen.
1. Melt the butter and the oil together and set aside.
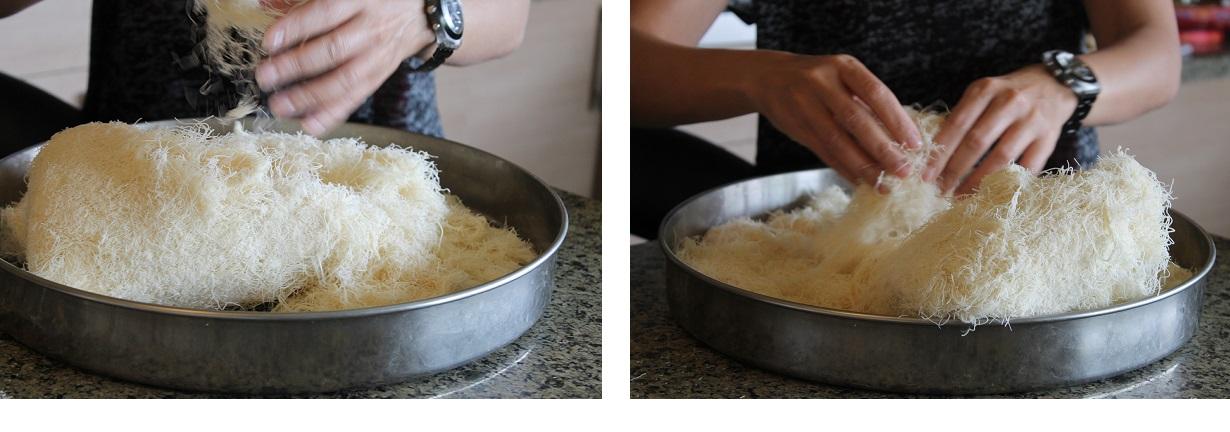
2. In a big bowl, use your hands to break the Konafa into small pieces. Frozen Konafa should easily break in your hands. If you are not using frozen konafa, you can use scissors to cut it to small bits. Take your time with this action and remove any bits that are too thick or dry.
3. Add the raw konafa in the tray to be able to roughly measure how much konafa you will need before you start rubbing the whole quantity with the butter/oil mixture. The konafa will still be fluffy and should reach a little less than the end of the tray edge.
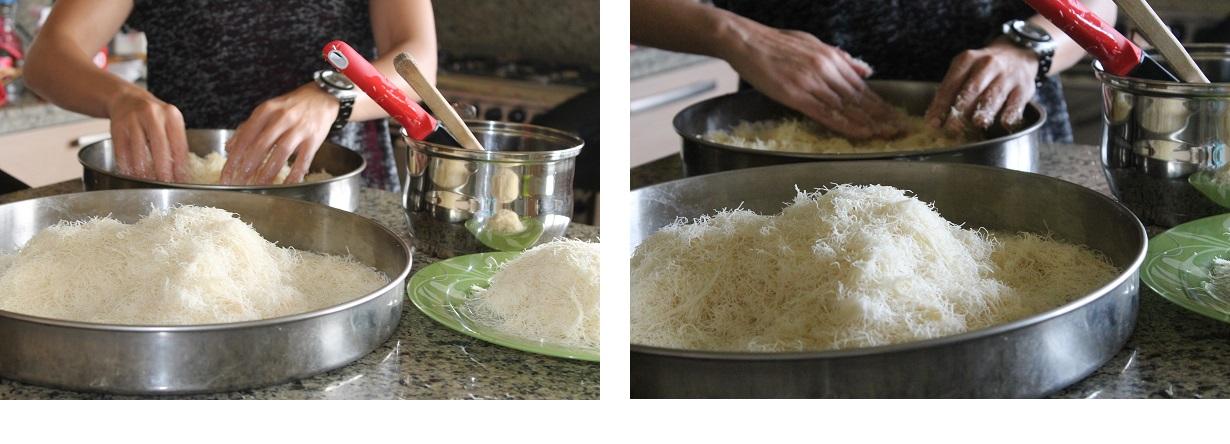
4. After you measure, move the konafa in another bowl to start rubbing the konafa with the butter/ oil mixture.
5. Use a ladle to add the butter mix (bit by bit) to the Konafa using your fingers to rub it all around the raw Konafa ensuring it is nicely coated and moist.
6. With your hands, start evenly pressing half the amount of Konafa in the tray. Make sure the base of the tray is very well covered without any holes before you pour the filling. Empty holes in the base lets the filling fall through to the bottom of the tray and burning – not allowing you to turn over the baked dessert.
7. Carefully spoon the filling on the konafa base leaving 1 cm border around the konafa because you don’t want it to ooze out of the konafa and stick to the tray. Don’t pour the filling in the middle then use a spoon to spread it, because you might end up spreading konafa pieces with it and it might result into a broken konafa base. Just spoon bit by bit all over the konafa base except the borders.
8. Put small pieces (like small cotton balls) of remaining second half of the konafa over the filling until you cover the whole tray. Use your hands to gently press.
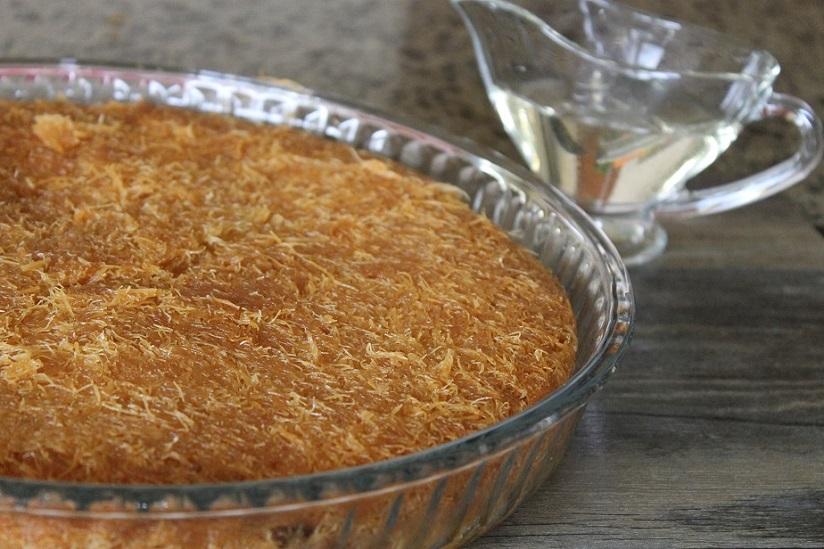
9. Preheat the oven at 200C for 10 minutes, before you lower the heat to 180C and bake it for 60 to 75 minutes (depending on your oven) until nice and golden. Please note that after 60 minutes you will need to check on the Konafa every 5 minutes. Let it take its time in the oven. Do not rush it so you don’t end up with Konafa that is golden from the outside while still raw from the inside.
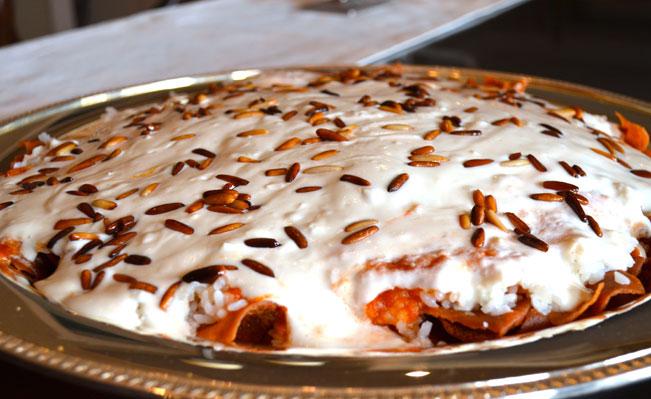
10. Leave it to cool down for 10 minutes then turn it over in the serving dish.
11. Use a ladle to pour your preferred amount of syrup over the warm Konafa. You can always serve more syrup in a bowl next to the dish so people can add to their liking.
Leave a comment
4 responses to “Mastering the Art of Konafa”
Leave a Reply
Share Article
Related Articles
Super-busy Working Mom Cooks the Traditional Fatta
Yes! Busy working mums can still achieve an amazing looking deliciously tasting Fatta. This is a fast, non-protein-based recipe that will keep your guests in awe. Dalia Allam is a marketing manager at an esteemed multinational, a mom to beautiful Nadia, 2 years, and a synchronized swimming coach after a lifetime of being an Olympics champion […]
Makloubet Setti – A Dish That Speaks Culture
Like all art, cooking can tell beautiful stories. It can take us to places we have never been, and expose us to new cultures and lifestyles – beyond just the simple mixing of ingredients and the creation of good flavours. Cooking can be a connection between one and his roots. Simply said, it is a […]

Your sweet tooth’s ‘It-Couldn’t-Be-Easier Brownies’
Have you ever tried to search for a brownie recipe? It is the most confusing recipe search ever! Recipes online as well as those big cooking shows are all so different and elaborate – from their ingredients list to their measures up to the instructions for baking. This motivated us to share with you our […]
Share Article
Related Articles
On Perfecting Asian Chicken at Home
On a sunny morning (while her two kids were at nursery, of course!), Shereen Badawi, was the first to invite CairoCooking.com into her cosy modern kitchen. Juggling between family, work and her studies in alternative medicine as well as a fairly busy social life, Shereen still finds time to cook daily, “mostly salads, steaks and […]
An Inspiration to Healthy Cooking – Shewekar Elgharably
CairoCooking’s ‘In your kitchen’ series aims to inspire food lovers by presenting passionate home cooks while they prepare their unique dishes. In doing so, we couldn’t ignore the whole healthy cooking wave – as mothers are refraining from saturated fats and excessive sugars while adding more greens and veggies into their family dishes. We couldn’t just present you with some ordinary […]

Summer Barbecues Inspiration from a Barbecue Fanatic
Without sophistication or too much fuss – barbecuing in the summer is such a fun gathering to look forward to. In terms of preparations, once you get the coal burning; you only need a couple of salads and some really good marinade for your protein. ‘In your kitchen’ is visiting the barbecue fanatic Mohamed Eweiss […]
Thank you. This is exactly what I was looking for.
Thank you Maha for your comment, we are happy you found the article useful! If you have any questions regarding the recipe, please feel free to post them here too and we are happy to answer all questions 🙂
excellent recipe for the konafa pls need recipe with racotta cheese filling
Thank you Nermine 🙂 For the ricotta filling, mix your ricotta cheese with 1 tablespoon powdered sugar. It is preferable that you add a little cream (قشطة) to the mix to achieve a creamy consistency. The rest of the konafa steps are the same.